 |
||
 |
||
 |
||
 |
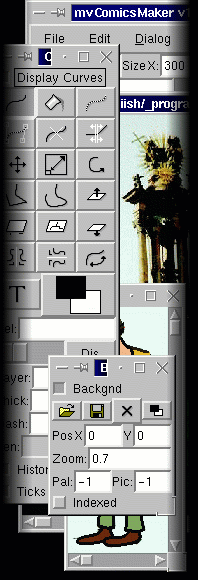
This text will introduce you to mvCM commands and functions. mvCM consists of 4 windows: main window (animation & file control), edit window (drawing area), curves window (vector graphics control) and background window (bitmap graphics control). You can show/hide windows, which you don't use. [ Main window ] [ Curves dialog ] |
 |
 |
||
 |
||
 |
||
 |
||
 |
||
 |
||
| Main window
|
||
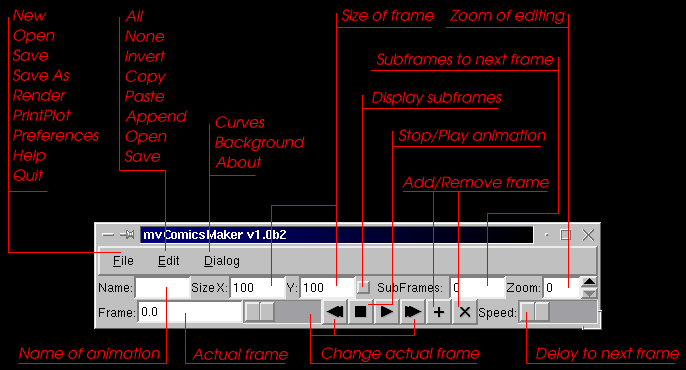
| As writen above, main window consists of functions for animation manipulation. |
||
 |
||
| menu consists of common functions, well known from other applications: | ||
|---|---|---|
| New | creates new animation (old one will be removed from memory). Only one animation in time can be edited. | |
| Open | opens an animation from disk (old one will be removed from memory). Only MVA and FLC/FLI file format is accepted. | |
| Save | saves animation on disk; animation will be saved in MVA format, which contains all data about bitmaps and vectors (everything you edited) | |
| Render | renders animation on disk; now you can render your animation into MVA or FLC file or set of BMP / PNG files. While creating animation there is a lot of real-time calculated data - resizing and moving images, calculating with vectors ... On slower computers it's not possible to play animation in requested speed (especially if you are working in true color mode). So with this command you can render (=calculate) all frames into pure bitmap animation. The result is much easyier and faster to play, but it's impossible to process vector data (and invisible parts of bitmaps) anymore. Before rendering animation, mvCM asks, how many times should be each number of subFrames multiplified - it means for example if there is 30 subframes in frame and you will enter 0.5, then only 15 subframes will be rendered. Resizing describes number, how will be each frame resized; for example if you'll put there 2, then each frame will be two times bigger. Compress flag describes, if the result animation will be compressed or not (it's considered only while rendering into MVA or FLC). Antialiasing describes, how will be curves antialiased. Slider says the amount of antialiasing. Works only in RGB mode. | |
| PrintPlot | not implemented yet | |
| Preferences | set up some functions of program; box size is size of control boxes showed when adjusting curves with the 'adjust' command. Tick size is size of ticks drawed on each begin/end of curve. Treshold describes the tolerance for welding vertices (it means, how far may the vertices be to consider them to weld). Also tolerance for selecting curves by the mouse. Curving constant is special constant used for calculating curves with 'curve' command. You'll best understand this function when you'll experience with it. Antialiasing is softening curves in rgb mode. Generally the amount of antialiasing says how will be result curve fater, than it was. Works only in RGB mode. And, finally, select & control color describe the colors of control boxes (adjust command) and selected curves. | |
| Edit | functions for editing curves; functions for selecting all or none curves; inverting selection; copying selection into memory (some kind of internal clipboard); pasting from memory. Function paste will paste curves with the same number they have had before using copy command. But append will create curves in the end of curves-list. So none older curve will be destroyed. Function open will open saved curves into clipboard (don't forget to paste/append them then). Save saves curves from 'clipboard' into file. | |
| Dialog | shows/hides curves and background windows | |
| Name | name of animation (doesn't have to be a filename) | |
| Frame | shows number of current frame in animation; notice, that number is float type. It's because of existence of subframes. For example frame 3.0011 means that actual (edited) frame is 3, but calculated subframe number is 11. Next to act.frame number there is slider, which also changes actual frame | |
| Prev | shows previous frame/subframe | |
| Next | shows next frame/subframe | |
| Stop | stops animation; makes sense only when an animation is playing | |
| Play | plays animation; while playing animation, other commands (number of actual frame, size of frame ...) are not updated (because of speed). The only thing while playing animation you can do is Stop it. After starting animation, mvCM will automatically switch into SubFrames mode, so you'll see whole animation | |
| Add | adds new frame in animation; new frame will be added right next to actual frame. The new frame will inherit background, pal, size and subframes from actual frame. After this the new frame will become active. If the actual frame was some of subframes (calculated), then new frame will get calculated data. So then you can process it. | |
| Del | delete actual frame | |
| Size X,Y | size of frame; each frame may have different size. Size of frame may be different from size of background. All background data are stored, even if not whole background is visible | |
| Speed | speed of whole animation while playing; 0-maximum speed | |
| SubFrames | number of subframes in frame; SubFrames are smaller frames between whole frames. SubFrames can't be modified directly by user. They are always computed by mvCM according to next and previous frame. For example if the number of subframes in current frame is 20, then all differences (also in bitmap and also in vectors) between current and next frame will be recalculated in 20 steps. SubFrames command can be switched on or off. If it's off, while using 'next' and 'prev' commands for showing animation mvCM will shows only whole frames -> frames, which can be edited by user. If it's on, all frames (also subframes) are visible | |
| Zoom | zoom of editing; for better editing details. 1:1 zoom is when the slider is zero (that means it's in the left) | |
| Curves dialog |
|
 |
displaying curves can be turned on or off; all commands
for curves managing are independed from background. The only thing, where
the curves are depended on the background is the palette (of course, only
in indexed mode). Curves always uses background's palette.
All curves have their numbers (first one has 0). The numbers are very important, because they are used for calculating in subframes. Always first curve from any frame is recalculated to first curve from next frame, second to second, third to third ... Also order of creating vertices of curve - first vertice will go on first vertice, second on second, ... Each curve has own layer number. Layers are displayed beggining with number 0 (it means, that curves in layer 0 are displayed first, then curves in layer 1 ...). It's very useful to store parts of shape into separated layers (for example: left hand=layer5, body=layer6, head=layer7, etc.). Because of easy selecting all curves in one layer (right mouse button while select command is active), you can then easily select just wanted part of picture, even if that part is not whole/good visible. some of the commands are accessible by hot-keys - these are accessible only when edit window is active. |
| Add | creates new curve; you can create new curve by pressing
left mouse button on frame's drawing area, moving and releasing. New curve
will have color same as actual color. New curve is created in actual layer
If you'll use right mouse button on drawing area while 'add' command is active, then active color is set to same color, where you pressed. So this way you can get any color from drawing area |
|---|---|
| Fill | fills poly created with curves; after pressing mouse button on the drawing area, area will by filled with actual color. Borders of area are set by curves in layer of fill (now it's actual layer). Fill command is also saved as vector data, so you can select it, move it, hide it, move it to different layer ... The position where you pressed mouse button is saved (and signed with small 'F') |
| Select | selects curve; when pressing left mouse button on some created
(&showed) curve, you can select/deselect it. In line bellow is automaticaly
created list of selected curves.
when using right mouse button on any curve, then all curves in the curve's layer are selected/deselected. This way you can easily find out, which curves are in which layer when using middle mouse button on any curve, then only this curve will be selected (all selected curves will be deselected) |
| Adjust | adjusts first of selected curves; after setting this option,
control boxes for first of selected curves will appear. You can change
shape of the curve by pressing into any of box and moving with it. If you'll
move some of vertices of curve onto any vertice of another curve, mvCM
will ask you, if you'll like to connect (weld) those vertices. If you'll
say yes, then the vertices will be connected together and after moving
with any of them, second one will move too. Also the vertice will be aligned
to same position as the other vertice.
If you'll use right mouse button, you will move only vertices holding ends of curve (not control vertices) If you'll change actual color while command adjust is set, then color of all selected curves will be set to actual color |
| Delete | deletes existing curve(s); after pressing this command all selected curves are deleted |
| Break | breaks connected vertices; after pressing mouse button on
any vertice, all connections on this vertice are broken
after pressing mouse button on any curve, then new vertice will be inserted (actually, the old curve will be changed into 2 curves) |
| Move | moves selected curves; by pressing mouse button on drawing area and moveing |
| Scale | scales selected curves; by pressing mouse button on drawing area and moveing |
| Rotate | rotates selected curves; by pressing mouse button on drawing area and moveing |
| Linear | makes all selected curves linear |
| Curve | makes all selected curves curved |
| Up | moves all selected curves into upper layer |
| Down | moves all selected curves into lower layer |
| Show | shows selected curves |
| Hide | hides selected curves; when you have hidden some curves, you can easily show them by select them (by directly writing their numbers) and press 'show' command |
| HMirror | horizontal mirror; mirrors selected curves horizontally |
| VMirror | vertical mirror; mirrors selected curves vertically |
| Exchange | exchanges vertices on curve or curves; if there is only one curve in selection, it's vertices will be exchanged. If there is more curves in selection, then first half of selection will be exchanged with the second half of selection (physicaly) |
| Text | writes text; with mouse cursor click when you want to put text. Then the text dialog is displayed, where you must set proper font path and then select any font. Font file is only mvc animation where each frame is proper character. |
| ChCol | same as pal in background window |
| Sel | list of selected curves; this list is automatically generated after selecting/deselecting any of curves. But also it's possible to edit this list directly - just write numbers of curves you want to select and divide them with any character (for example ',') |
| Dis | makes dissortion on selected curves. The command will randomly move all vertices of selected curves. The amount of randomizing is set by the slider. |
| Layer | actual layer - shows depth (layer) of first of selected curves; in this window is automatically displayed layer used by curve which is first in selection. If you'll enter any number here, then all selected curves are moved into specified layer |
| Thick | thickness of curve; shows thickness of first of selected curves; after changing the number here, the thickness of all selected curves will be set to this size |
| Len | shows length of first of selected curves. Don't be surprised when len of curve changes rapidly after adjusting linear curve. Len is helpful when you want be sure that len is approx. same as in other frame |
| History | shows history of animation; after changing value of this slider to more than 0 and setting it on, previous frames and subframes will become visible. In rgb mode older (sub)frames will fade-out into background color |
| Ticks | turns on/off of showing ticks on the ends of curves; also shows/hides signs of fills; fills are signed with 'F' |
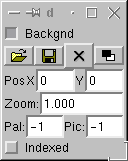
| Background dialog |
|
 |
showing background can be turned on or off; all commands
for background managing are independed from curves. The only thing used
by the curves is palette (only in indexed color mode).
background is always the first thing displayed in the animation. Then the curves are displayed. Background may be much bigger, than size of frame. You can use large background and then just easy scroll around it. Or you can use large background, zoom it out and make animation. And in wonted moment you can easily make detail of any part of picture. |
| Open | opens BMP/PNG file format as background; background picture may by different size than frame size; always all background data are stored |
|---|---|
| Save | saves BMP/PNG file format as background; all background data are saved |
| None | disposes background |
| ChCol | sets actual color; after pressing this button, actual palette
is shown and you can choose any color. In indexed mode (it depends on background
type) you can choose color from used palette, with rgb values you can change
selected color. In rgb type none palette is displayed, only one color,
which is currently set with rgb values. rgb values are in range <0,255>
(real numbers). In rgb mode you can set alpha layer (transparency) for
each color (in range <0,255>). You can choose actual/background color.
Actual color is color, which will be used for curve drawing. Also, when
you'll change actual color with 'adjust curve' selected, then color of
all selected curves will be changed into new color
Background color is color stored in each frame and is used when you turn off background or while using 'history' command in rgb mode You can load palette from any file at requested position. Palette should be in classical format (byte *pal[768]). Or you can store palette on the disk |
| Pos | sets position of the picture; using this command you can easily make scrolling background in your animation |
| Zoom | sets size of the picture; float number shows, how the background pic is showed (1=normal, <1=zoom out, >1=zoom in) |
| Pal | sets, which pal will be used in this frame; in simple animations with indexed pictures, only one palette is enough. You can store it in first frame (for example) and for other frames set their pal on frame 0 (so they'll use palette from frame 0). It's faster and also it saves space. If the value is -1, it means, that the frame has own palette (or doesn't have any) |
| Pic | sets, which pic will be used in this frame; when you have animated curves on the same background, you should use it. Also when you just want to manipulate with one picture (scrolling, zoom), you'll use it. The number here says, from which frame will picture be used. If there is -1, then the frame has own picture (or doesn't have any). If frame doesn't have own picture, type (indexed/rgb) can't be changed |
| Indexed | this frame uses indexed colors mode - 256 colors palette; you can change it only when there is background picture present in the frame. |
| RGB | this frame uses true colors mode; you can change it only when there is background picture present in the frame. |